 风禾源泉
风禾源泉一、背景
Electron 可创建多个容器 (A 和 B), B 在 A 的上层,现在上层的 B(全屏且有背景颜色) 的某一区域,需要透露出A的内容。 为了实现这一诉求,我们找到一方案,通过CSS clip-path属性在 B 容器实现局部透明区域,使底部 A 内容自然透出。 课件 Demo 中 Frame 案例
二. 技术原理
2.1 CSS clip-path 基础
CSS clip-path 属性通过定义裁剪区域实现选择性内容展示:
polygon()函数:使用坐标点序列定义多边形裁剪区域
闭合原则:自动连接首尾坐标点形成闭合区域
混合坐标系:支持百分比相对坐标与像素绝对坐标混合使用
2.2 坐标系统
坐标系基准:以目标元素左上角为原点(0,0)
动态计算:通过getBoundingClientRect()实时获取元素物理坐标
响应式支持:百分比值自动适应容器尺寸变化
2.3 裁剪原理
css
clip-path: polygon(x1 y1, x2 y2, x3 y3, ...);每个点由 x 和 y 坐标组成
点按顺序连接形成多边形
最后一个点会自动与第一个点连接,形成闭合区域
三. 实现方式
3.1 基础类实现
typescript
export class ClippyBase {
public isDebug: boolean;
// 获取裁剪路径
public getPolygonFrameAll(config: { c1: IRect, c2?: IRect }) {
if (!config.c2) {
return this.getPolygonLeft(config.c1);
}
return this.frameLeftAndRight(config);
}
// 单区域裁剪
private getPolygonLeft(c: IRect) {
const { x, y, w, h } = c;
const cx = x;
const cy = y;
const cx_cw = x + w;
const cy_ch = y + h;
// 计算关键点
const a3 = a6 = a2 = a7 = `${cx + 1}px`;
const b3 = b4 = `${cy + 1}px`;
const a4 = a5 = `${cx_cw - 1}px`;
const b6 = b5 = `${cy_ch - 2}px`;
// 生成裁剪路径
const result = [
[0, 0], // 左上角
[0, '100%'], // 左下角
[a2, '100%'], // 左下内角
[a3, b3], // 左边界点
[a4, b4], // 上边界点
[a5, b5], // 右边界点
[a6, b6], // 下边界点
[a7, '100%'], // 右下内角
['100%', '100%'], // 右下角
['100%', 0], // 右上角
];
return this.getPolygon(result);
}
private frameLeftAndRight({ c1, c2 }: { c1: IRect, c2?: IRect }) {
if (!c2) {
return [];
}
const { x: x2, y: y2, w: w2, h: h2 } = c2;
const singleFrame = this.frameLeft(c1);
const last = singleFrame[singleFrame.length - 1];
const rest = singleFrame.slice(0, -1);
let b9, a10, b10, a11, b11, a12, b12, a13, b13, b14 = '';
const cx = `${x2 + 1}px`;
const cy = `${y2 + 1}px`;
const cx_cw = `${x2 + w2 - 2}px`;
const cy_ch = `${y2 + h2 - 2}px`;
a10 = a11 = cx;
b11 = b12 = cy;
a12 = a13 = cx_cw;
b9 = b10 = b13 = b14 = cy_ch;
const result = [
...rest,
['100%', b9],
[a10, b10],
[a11, b11],
[a12, b12],
[a13, b13],
['100%', b14],
last,
];
return result;
}
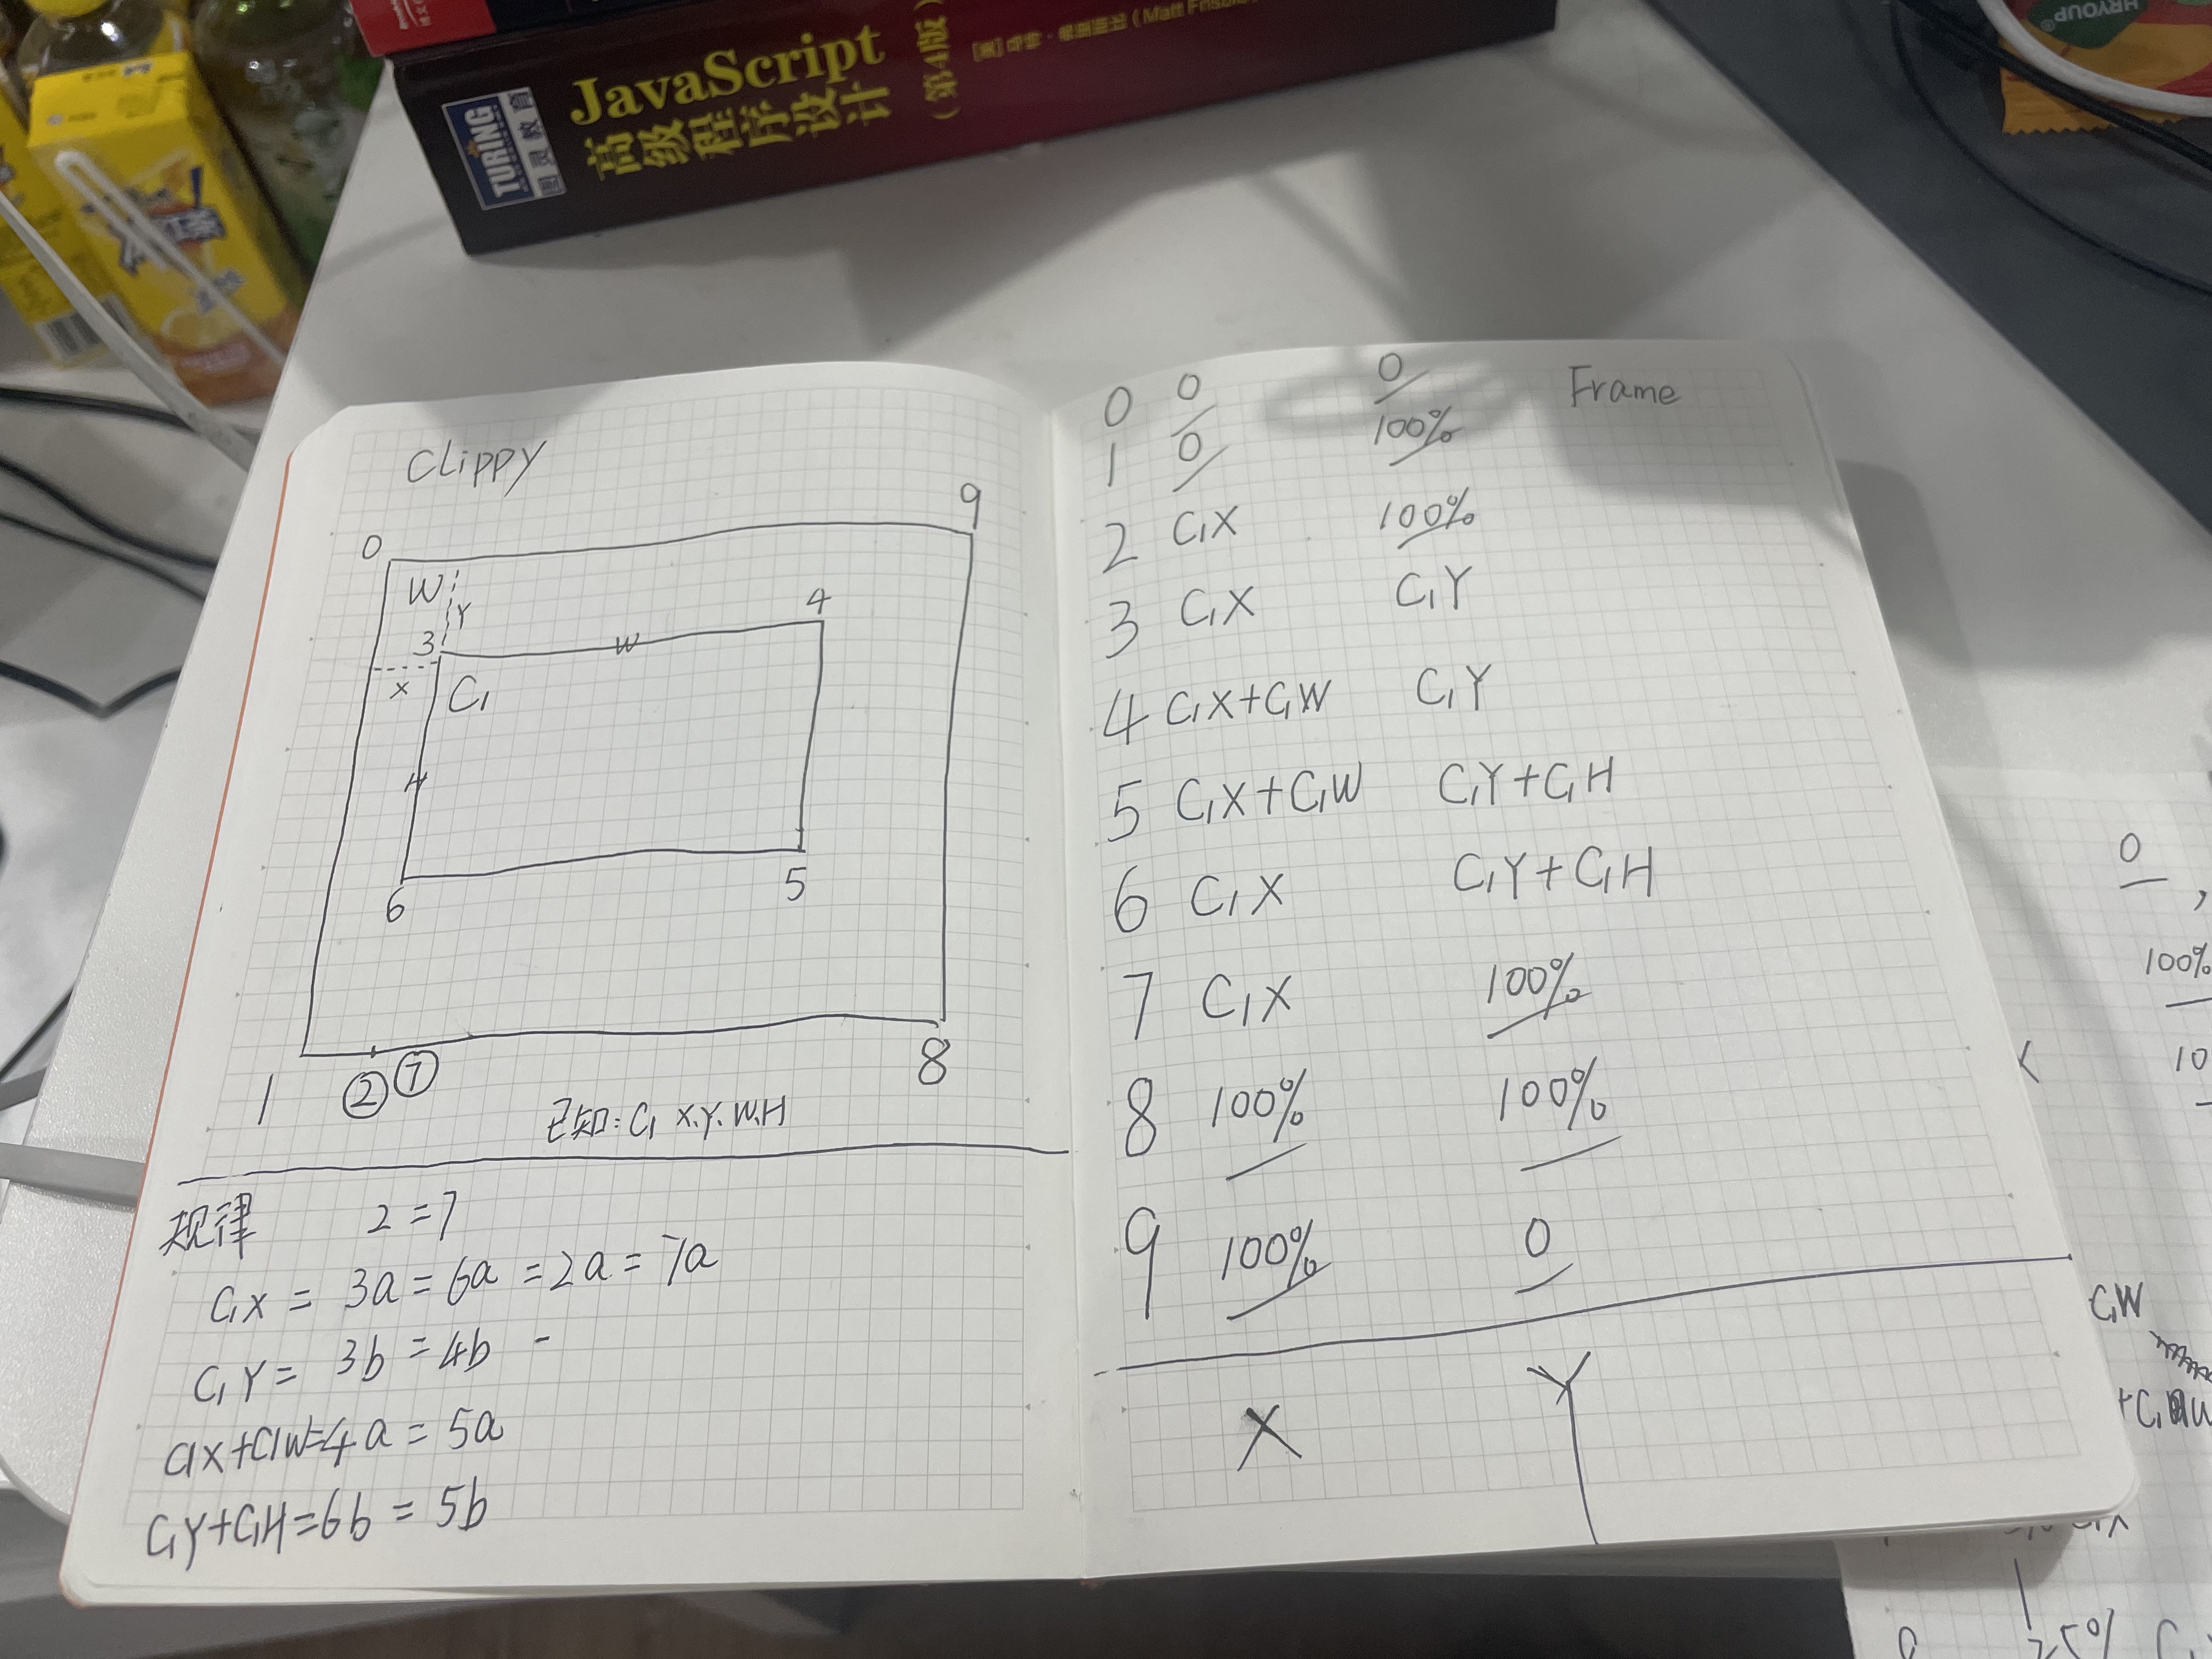
}3.2 挖一个框实现方式
已知所挖的框为 C1, 可计算出 C1 距离外层框的 x 轴、y 轴、和其本身的宽 w、 高 h
按照如下 0 - 9个点位,可实现挖一个透底的框,点位坐标见下图右侧枚举
具体实现方式见:getPolygonLeft 方法
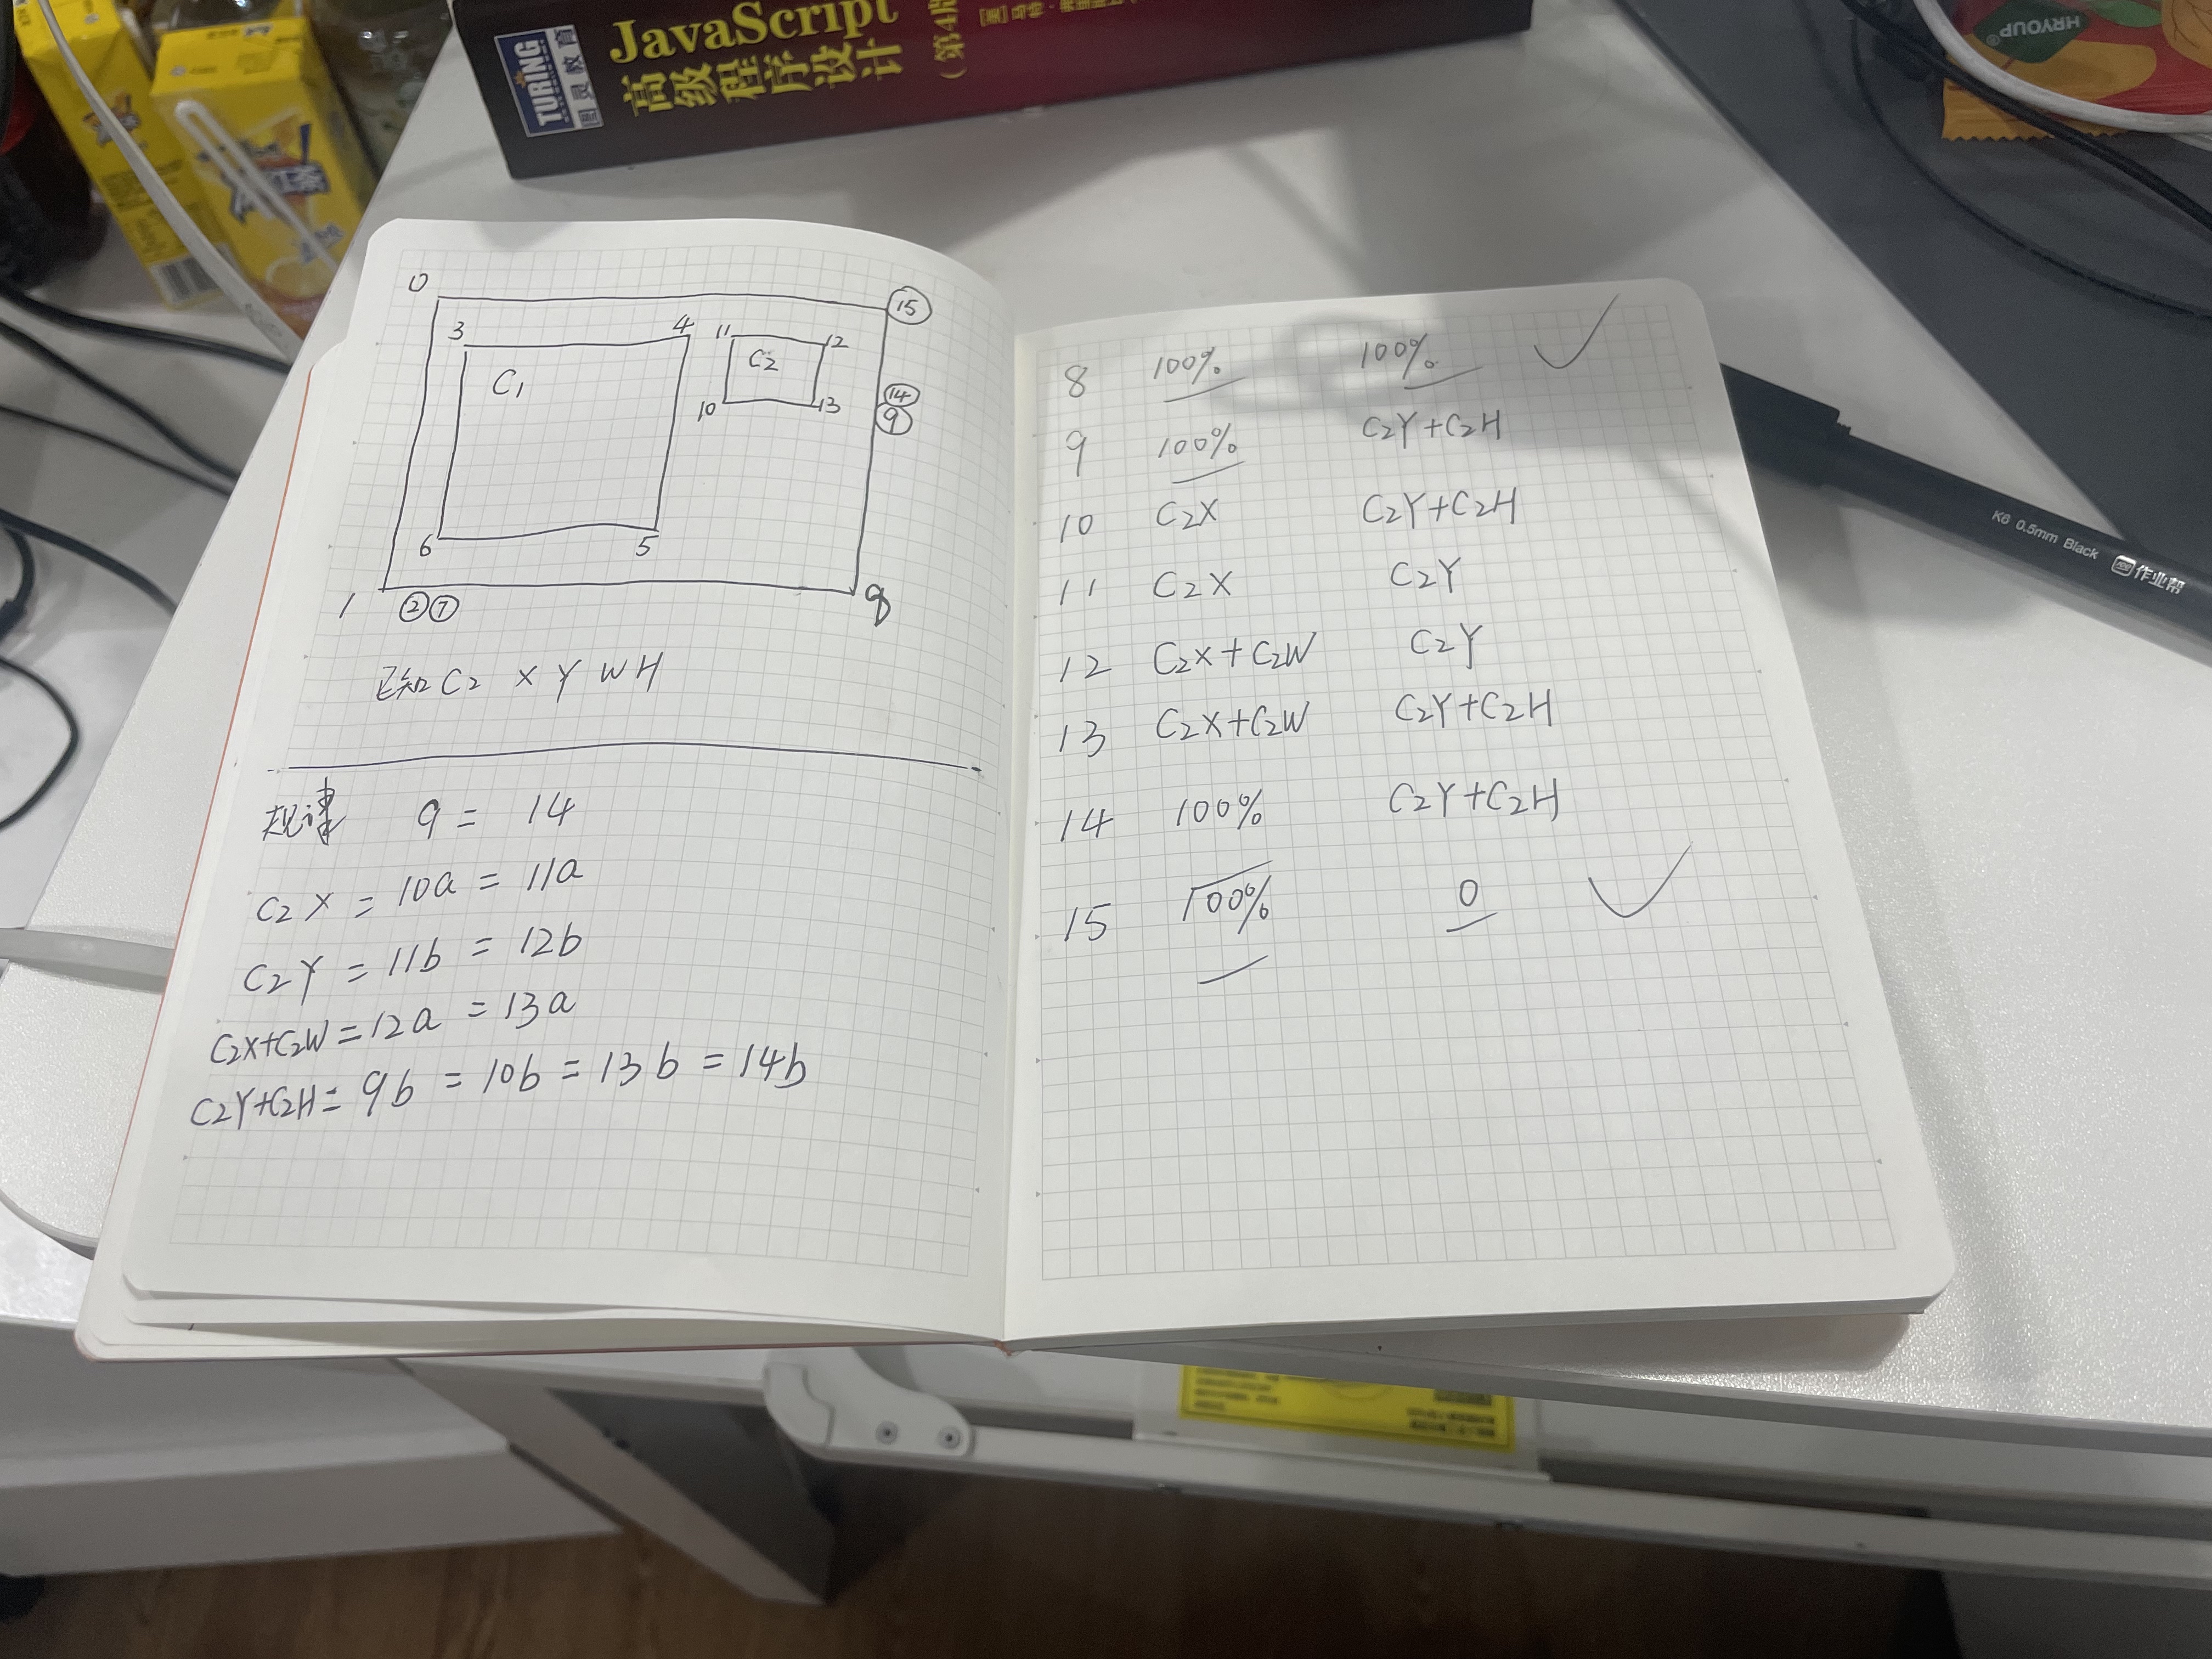
3.3 挖二个框实现方式
已知所挖的框为 C1 和 C2 , 可计算出 C1、C2 距离外层框的 x 轴、y 轴、和其本身的宽 w、 高 h
按照如下 0 - 15个点位,可实现挖二个透底的框,点位坐标见下图右侧枚举
具体实现方式见:getPolygonLeft 方法
四. 使用方法
4.1 基本使用
typescript
// 创建实例
const clippy = new ClippyBase();


// 定义裁剪区域
const rect = {
  x: 100,  // 左边界
  y: 100,  // 上边界
  w: 200,  // 宽度
  h: 150   // 高度
};


// 获取裁剪路径
const path = clippy.getPolygonFrameAll({ c1: rect });


// 应用裁剪
element.style.clipPath = path;
4.2 双区域裁剪
typescript
// 定义两个裁剪区域
const rect1 = { x: 100, y: 100, w: 200, h: 150 };
const rect2 = { x: 400, y: 100, w: 200, h: 150 };


// 获取双区域裁剪路径
const path = clippy.getPolygonFrameAll({ c1: rect1, c2: rect2 });


// 应用裁剪
element.style.clipPath = path;
4.3 实际应用示例
typescript
import { ClippyBase } from './base';
import { IClippyConfig, IRenderInfoFull, IRenderInfo, IClippyMain, IRect } from './interface';
import { isOpenD3D } from '@/common/gray';


class ClippyFactory extends ClippyBase {
  public readonly isOpen = isOpenD3D();
  public isFullScreen = false;
  public main: IClippyMain | null = null;
  public lecture: IRenderInfo | null = null;
  public lectureFull: IRenderInfoFull | null = null;
  public teacher: IRenderInfo | null = null;
  public hasTeacher = true;


  public getElement(id: string): HTMLElement | null {
    return document.getElementById(id);
  }


  public init(config: IClippyConfig) {
    const { main, lecture, hasTeacher, teacher } = config;
    this.hasTeacher = hasTeacher;
    this.log('初始化 init', config);


    const mainElement = this.getElement(main.id);
    if (!mainElement) {
      throw new Error(`Main element with id ${main.id} not found`);
    }


    this.main = {
      id: main.id,
      $ele: mainElement,
      clipPath: {
        default: '',
        full: '',
      },
    };


    this.lecture = this.setRenderInfo(lecture.id);


    this.lectureFull = {
      id: this.lecture.id,
      $ele: this.lecture.$ele,
      clipSize: { x: 0, y: 0, w: 0, h: 0 },
      size: { x: 0, y: 0, w: 0, h: 0 },
      isFullScreen: true,
    };


    if (hasTeacher && teacher && teacher.id) {
      this.teacher = this.setRenderInfo(teacher.id);
    }
    this.log(`画布 ${hasTeacher ? '有' : '无'} 老师区`, this.lecture, this.teacher);
    return {
      lecture: this.lecture,
      teacher: this.teacher,
    };
  }


  public setRenderInfo(id: string) {
    const $ele = document.getElementById(id) as any;
    const parentRect = this.main && this.main.$ele ? this.main.$ele.getBoundingClientRect() as any : { y: 0 };
    const { x, y: childRectY, width: w, height: h } = $ele.getBoundingClientRect();
    const ay = childRectY;
    const y = childRectY - parentRect.y;


    return {
      id,
      $ele,
      clipSize: { x, y, w, h },
      size: {x, y: ay, w, h},
    };
  }


  /** 打开 */
  public open() {
    if (!this.isOpen) {
      return;
    }
    if (this.isFullScreen) {
      return this.fullScreen();
    }
    return this.defaultScreen();
  }


  public change(config: { isFullScreen: boolean }): IRect | undefined {
    if (!this.isOpen) {
      return;
    }
    this.isFullScreen = config.isFullScreen;
    return this.open();
  }
  public close() {
    if (!this.isOpen) {
      return;
    }
    this.main && this.main.$ele && (this.main.$ele.style.clipPath = '');
  }
  private defaultScreen() {
    if (this.main && this.main.clipPath.default && this.lecture && this.lecture.size) {
      this.main.$ele.style.clipPath = this.main.clipPath.default;
      this.log('defaultScreen 使用 缓存');
      return this.lecture.size;
    }


    if (!this.lecture) {
      return;
    }
    if (!this.lecture.size.w && this.lecture.id) {
      this.lecture = this.setRenderInfo(this.lecture.id);
    }


    const polygon = this.getPolygonFrameAll(
      {
        c1: this.lecture.clipSize,
        ...(this.hasTeacher && this.teacher ? { c2: this.teacher.clipSize } : {}),
      },
    );


    this.log('默认尺寸', polygon);


    if (this.main) {
      this.main.clipPath.default = `polygon(${polygon})`;
      this.main.$ele.style.clipPath = `polygon(${polygon})`;
      return this.lecture.size;
    }
  }


  private fullScreen() {
    if (this.main && this.main.clipPath.full && this.lectureFull && this.lectureFull.size) {
      this.main.$ele.style.clipPath = this.main.clipPath.full;
      return this.lectureFull.size;
    }
    if (!this.lectureFull) {
      return;
    }


    this.lectureFull = {
      ...this.setRenderInfo(this.lectureFull.id),
      isFullScreen: true,
    };


    const polygon = this.getPolygonFrameAll(
      {
        c1: this.lectureFull.clipSize,
      },
    );
    this.log('全屏', polygon);


    if (this.main) {
      this.main.clipPath.full = `polygon(${polygon})`;
      this.main.$ele.style.clipPath = `polygon(${polygon})`;
      return this.lectureFull.size;
    }
  }
}


export const clippyFactory = new ClippyFactory();
Q、问题
问题一:挖洞的矩形,及底部视频窗体矩形都只能做到直角,但是用户看到的视频流,需要带圆角的
- 解决方案: svg 绘制 圆角盖在最上层,详情可见